How to electrochemically etch
How electrifying!

April 10th, 2020
Electrochemical etching is a process to add your own designs onto metal. It etches a design onto a plate by submerging a metal object in an electrically conductive solution and applying electricity as direct current (Harvey et al., 2022). It allows for a low-cost and durable way to engrave on metal.
The theory behind it is simple: a metal plate partially covered in a resist will have the uncovered surface oxidized and in a slight depression (Harvey et al., 2022). The oxidized surface with the depression will create the darker parts of the etch.
I will show a simple process on how to electrochemically etch your own designs onto metal. This post will be focusing on etching on copper; a future post will discuss etching on other materials.
Materials you’ll need:
- Table salt (NaCl)
- A pumice stone (or another abrasive)
- Two copper coupons, one for etching and the other as a “sacrifice” (Cu)
- A bucket of water
- Vinyl and some way to cut a design into vinyl
- Electric tape
- Power supply
- Alligator wires
- Plastic tub big enough to submerge both coupons parallel to each other
- Distilled water (H2O), enough to cover the coupons in the plastic tub
Step 1. Pour the water in the bucket and dissolve the table salt in it.
Step 2. Polish the surface of the copper coupon you would like to etch to get rid of dirt and grease
Step 3. Apply the vinyl design onto the copper coupon you would like to etch. Make sure a design has been cut into the vinyl.
Step 4. Connect a wire to the back of the copper coupon. Cover the back and sides with electric tape. Note that all metal exposed to water will be etched.
Step 5. Connect the sacrificial piece to another wire.
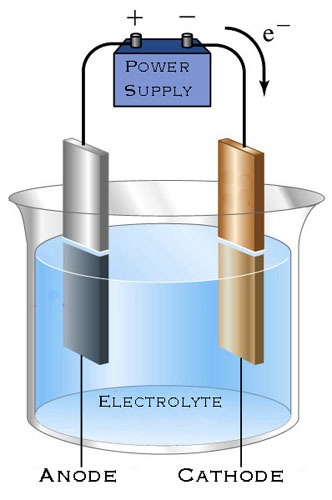
Step 6. Connect the plate that you wish to etch to the positive terminal (anode) of the power supply and connect the sacrificial plate (cathode) to the negative terminal.
Step 7. Submerge the plates and turn on the power supply. Leave it in for a while.
Step 8. Turn off the current when you are satisfied with the result (time needed may vary). Do not leave the plates too long as the etching process will start to eat away at metal under the resist.
Step 9. Polish the finished product’s surface with a pumice stone.
And... that's it! You now have an electrochemically etched piece of metal.


